It's Time to Put Everything Into Practice
You've learned about brokers, analysis types, chart types, timeframes, and candlesticks. Now it's time to do it for real — on a demo account, of course. No risk, just learning.
This is a step-by-step walkthrough of placing your very first complete trade. Not just clicking "Buy" — but analyzing, planning, and executing a trade the right way from the start.
Your First Trade — Step by Step
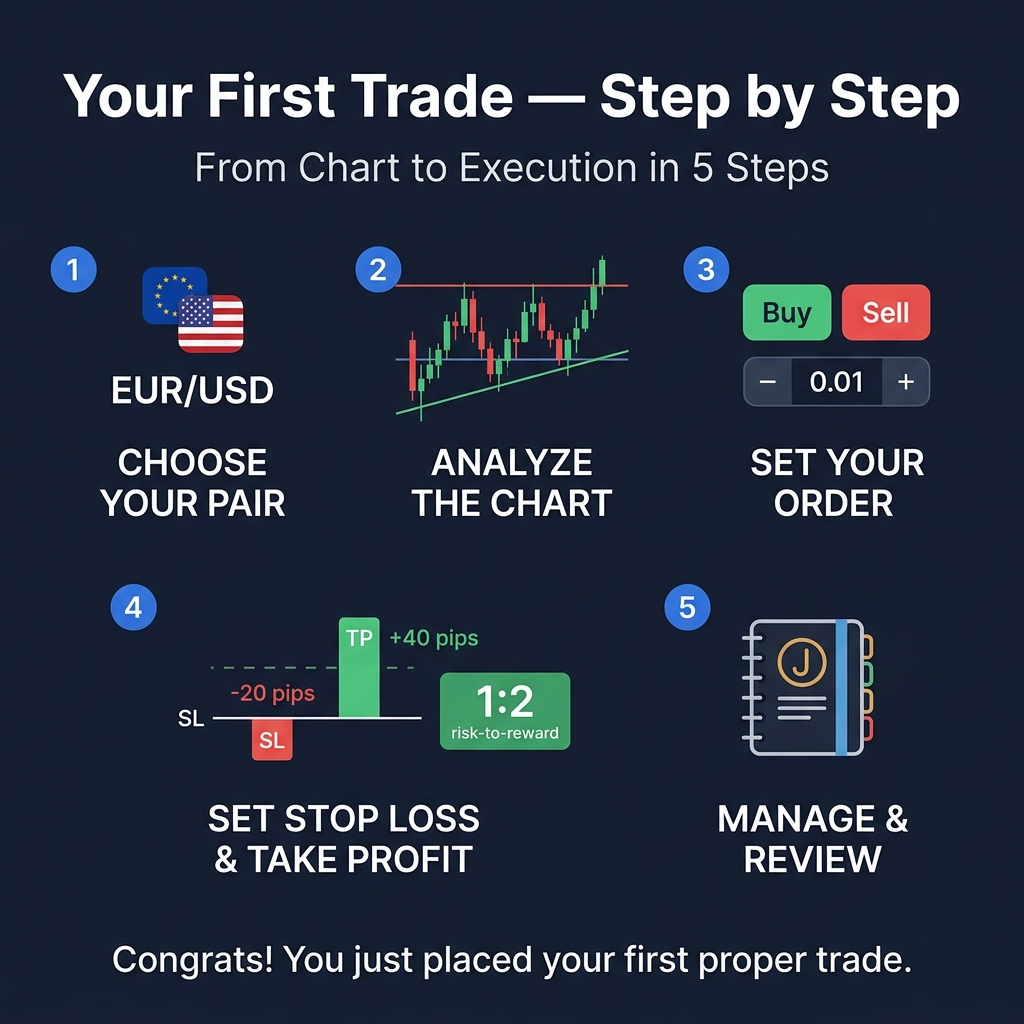
Step 1: Choose Your Currency Pair
For your first trade, stick with EUR/USD. It's the most traded pair in the world — tight spreads, high liquidity, and plenty of educational material available.
Open EUR/USD on the H1 (1-hour) timeframe.
Step 2: Analyze the Chart
Before clicking anything, look at the chart for 2 minutes. Ask yourself:
- Is price trending up, down, or sideways?
- Can you see any obvious support or resistance levels?
- Are there any candlestick patterns at key levels?
For this practice trade, identify a direction. If price looks like it's going up and you see support below → you'll buy. If price looks like it's going down → you'll sell.
Step 3: Set Your Order
Click "New Order" on your platform. Set these parameters:
| Parameter | Your Setting | Why |
|---|---|---|
| Symbol | EUR/USD | Most liquid pair |
| Volume | 0.01 lots (micro lot) | Smallest possible risk |
| Type | Market Execution | Buy/Sell at current price |
Step 4: Set Stop Loss & Take Profit
This is the most important step. Never open a trade without a stop loss.
- Stop Loss: 20 pips below your entry (for a buy trade). This limits your loss to approximately $0.20 on a micro lot.
- Take Profit: 40 pips above your entry. This gives you a 1:2 risk-reward ratio — risking $0.20 to potentially gain $0.40.
🎯 The 1:2 rule: Always aim for a reward that's at least twice your risk. If you risk 20 pips, target at least 40 pips. This way, you only need to be right 40% of the time to be profitable.
Step 5: Execute and Manage
Click Buy (or Sell). Your trade is now live! Now what?
- Don't stare at the screen. You've set your stop loss and take profit. Let the trade work.
- Don't move your stop loss further away if price goes against you. That's the mistake that blows accounts.
- Record the trade in a journal: entry price, stop loss, take profit, why you took the trade, and the result.
Your Trade Journal Template
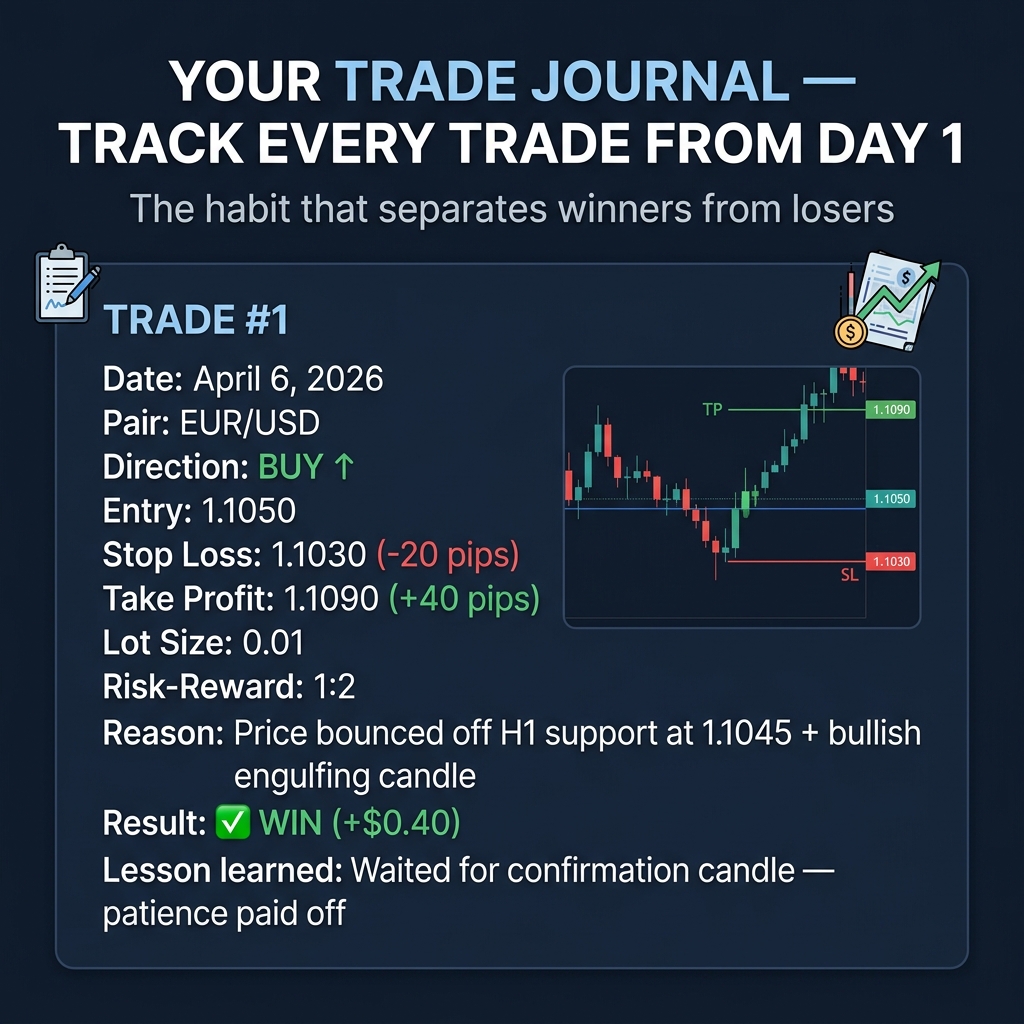
Start journaling from trade #1. Here's what to write down:
| Field | Example |
|---|---|
| Date | April 6, 2026 |
| Pair | EUR/USD |
| Direction | Buy |
| Entry | 1.1050 |
| Stop Loss | 1.1030 (-20 pips) |
| Take Profit | 1.1090 (+40 pips) |
| Lot Size | 0.01 |
| Reason | Price bounced off support at 1.1045, bullish candle on H1 |
| Result | Win / Loss / Breakeven |
| Lesson Learned | What I'd do differently next time |
What to Expect From Your First Trades
Let's be realistic:
- Your first few trades will probably lose. That's normal. Everyone's do.
- You'll feel the urge to close winning trades too early and hold losing trades too long. Fight it.
- You'll want to trade more after a win and revenge trade after a loss. Resist.
The goal of your first 20ss trades isn't profit — it's building correct habits: proper position sizing, always using a stop loss, maintaining a 1:2+ risk-reward ratio, and journaling every trade.
Quick Recap
- ✅ Start with EUR/USD on the H1 timeframe
- ✅ Use 0.01 lots (micro) — smallest risk possible
- ✅ Always set a stop loss — never trade without one
- ✅ Aim for 1:2 risk-reward ratio (20 pip SL → 40 pip TP)
- ✅ Journal every trade from day one
- ✅ Focus on habits, not profits
Congratulations! 🎉
You've completed Level 2: The Foundation. You now understand how brokers work, the three types of analysis, how to read charts and candlesticks, and how to place your first trade properly.
Next up: Level 3 — Protect Your Money. This is where you learn position sizing, stop losses, and the risk management rules that separate survivors from statistics.