From Theory to Trigger — Your First Complete MTF Trade
You've learned the top-down approach. You know which timeframe combos work for each style. Now it's time to put it all together into a complete, executable trade setup — from opening your charts to placing the order.
This lesson walks you through two real-world examples, step by step, so you can replicate the exact process on your own charts tomorrow morning.
Example 1: Swing Trade — Buying EUR/USD
Timeframe combo: Daily → H4 → H1 (Swing Trading)
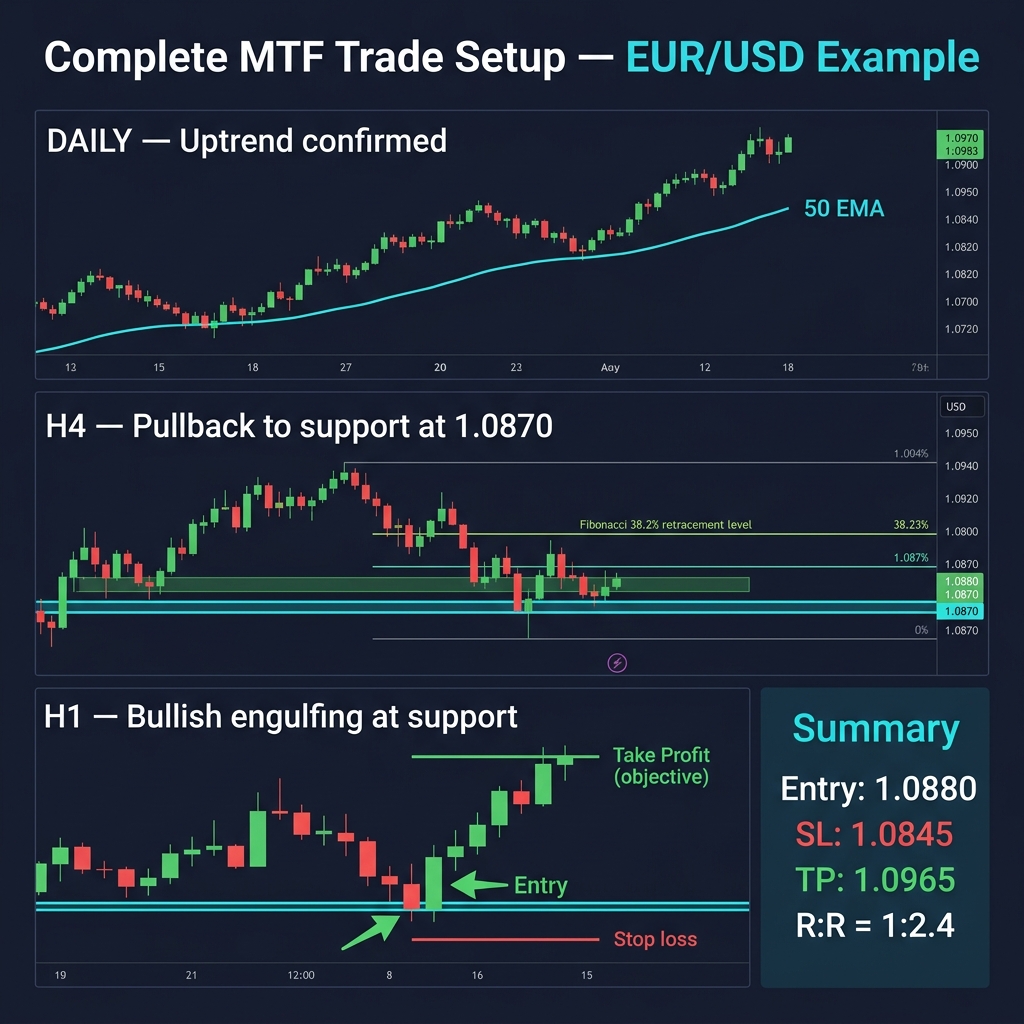
Step 1: Daily Chart — Read the Big Picture
- EUR/USD is in a clear uptrend — price above 50 EMA, making higher highs and higher lows
- Last swing high: 1.0960. Last swing low: 1.0780
- Major daily resistance ahead at 1.1000 (psychological level)
- Decision: I'm only looking for BUYS
Step 2: H4 Chart — Find the Setup
- Price pulled back from the recent high at 1.0960
- Currently testing 1.0870 — this was the breakout level from the last push up
- 1.0870 coincides with 38.2% Fibonacci retracement of the last swing
- RSI on H4 at 42 — not oversold, but dropped from 68. Hidden bullish divergence forming
- Decision: The setup is a PULLBACK BUY at 1.0870 support zone
Step 3: H1 Chart — Pull the Trigger
- Price touches 1.0872 and forms a bullish engulfing candle — strong rejection of the support zone
- RSI bounces from 33, confirming buyer interest
- The engulfing candle closes at 1.0885
Step 4: Define the Trade
| Component | Value | Reasoning |
|---|---|---|
| Entry | 1.0888 | Open of next candle after bullish engulfing |
| Stop Loss | 1.0845 | Below H4 support + 25 pip buffer (43 pips) |
| Take Profit 1 | 1.0960 | Previous H4 swing high (72 pips) |
| Take Profit 2 | 1.1000 | Daily psychological level (112 pips) |
| Position Size | 0.23 lots | $100 risk ÷ 43 pips = 0.23 lots |
| R:R (TP1) | 1:1.7 | |
| R:R (TP2) | 1:2.6 |
Step 5: Trade Management
- When price reaches TP1 (1.0960) — close 50% of position, move SL to breakeven
- Let remaining 50% run toward TP2 with trailing stop on H4
- Monitor on H4 — don't micromanage on H1
Example 2: Day Trade — Selling GBP/USD
Timeframe combo: H4 → H1 → M15 (Day Trading)
Step 1: H4 Chart — Direction
- GBP/USD in downtrend — price below 50 EMA, making lower highs
- Major resistance at 1.2720 (previous support, now resistance — polarity)
- Decision: SELLS only
Step 2: H1 Chart — Setup
- Price rallied up to 1.2710 — approaching H4 resistance
- RSI at 65 and showing bearish divergence (H1 RSI making lower high while price makes higher high)
- Trendline resistance from the last 3 lower highs also lines up
- Decision: Short setup at 1.2710-1.2720 zone
Step 3: M15 Chart — Entry
- Price touches 1.2718 and forms a bearish pin bar on M15
- Enter short on next candle at 1.2712
Step 4: Trade Parameters
- Entry: 1.2712 | Stop: 1.2745 (33 pips) | Target: 1.2640 (72 pips)
- R:R = 1:2.2 ✅
- Trade closed same day — no overnight risk
Your MTF Pre-Trade Checklist
Before every trade, answer these 8 questions:
- ✅ Higher TF trend: What direction am I allowed to trade?
- ✅ Higher TF S/R: Where are the major zones?
- ✅ Middle TF setup: What's the specific opportunity?
- ✅ Confluence count: How many factors agree? (Need 3+)
- ✅ Lower TF trigger: What confirms my entry?
- ✅ Stop loss: Where is my thesis invalidated?
- ✅ Target: Where is the logical exit?
- ✅ Position size: How much can I risk on this trade?
If you can't answer all 8 clearly, you don't have a trade — you have a gamble.
Quick Recap
- MTF trading follows a clear sequence: direction → setup → entry → management
- Always define all trade parameters before entering — entry, SL, TP, position size
- Use the 8-question checklist before every trade
- Manage trades on the middle timeframe, not the entry timeframe
- Close partial positions at TP1 and trail the rest — this locks in profits while letting winners run
🎯 Your Action Step
Pick one pair (EUR/USD or GBP/USD) and your chosen timeframe combo. Walk through the complete 8-question checklist on today's chart. Even if there's no trade right now, complete the analysis: "Daily = uptrend, H4 = pullback to 1.0870, H1 = no trigger yet — I'll wait." Screenshot your analysis and save it. Do this daily for one week. By day 7, the process will feel natural.