Where Everything Comes Together
You've learned support and resistance. You've learned candlestick patterns. Now it's time for the most important lesson in this entire level: combining them into a complete trading system.
Think of S&R as the "where" and candlesticks as the "when". Separately, each gives you incomplete information. Together, they form an extremely powerful decision-making framework that professional traders use every single day.
This lesson brings everything from Level 4 together into one actionable system.
The Complete Setup: S&R + Candlestick Pattern
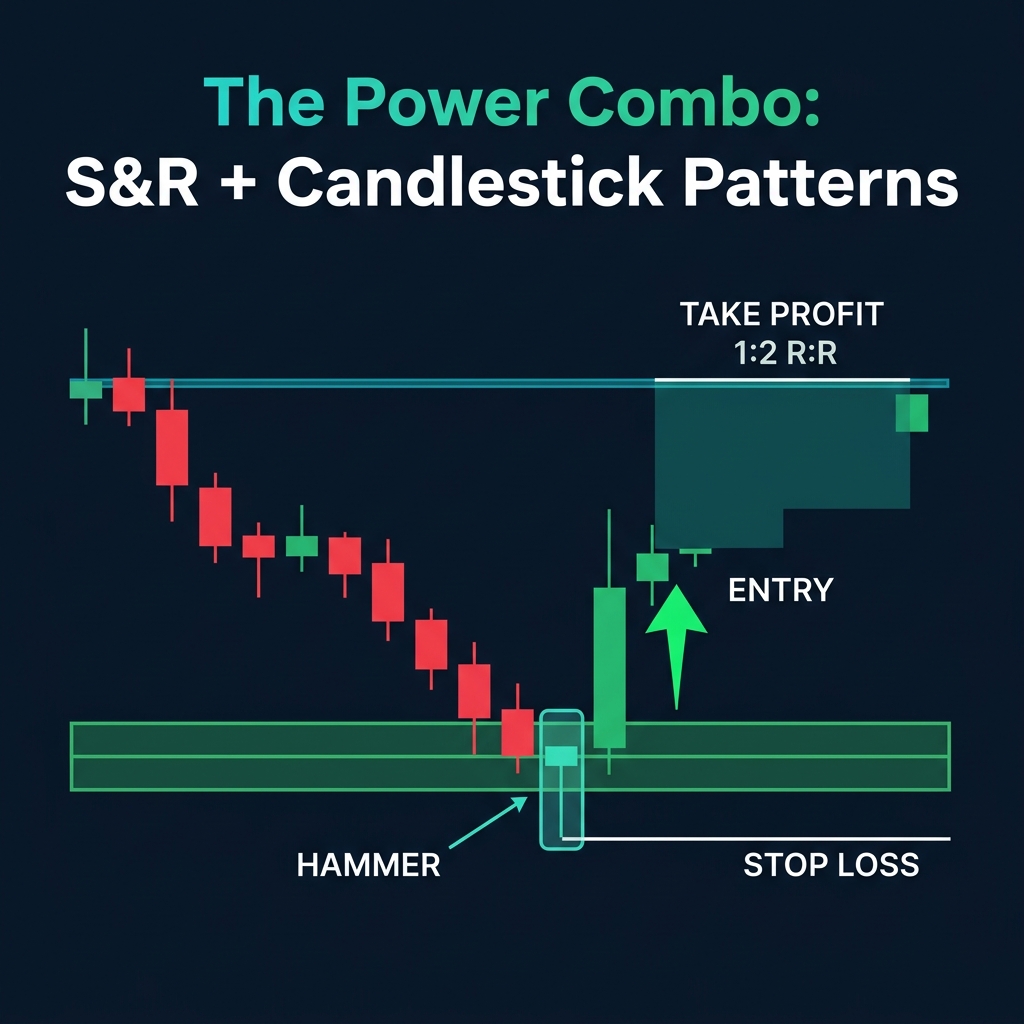
Here's the step-by-step process for every trade you'll take using price action:
Step 1: Identify Key S&R Levels
Before the market opens (or at the start of your session), draw your key support and resistance zones on the Daily and H4 charts. Remember: zones, not lines. 3-4 levels max on each side.
Step 2: Wait for Price to Reach a Level
This is where most beginners fail — they get impatient. Professional traders wait for price to come to their levels. You don't chase price. You let it come to you.
Step 3: Look for a Candlestick Signal
When price touches your pre-drawn level, look for one of these patterns:
| At Support (Buy Signals) | At Resistance (Sell Signals) |
|---|---|
| Hammer | Shooting Star |
| Bullish Engulfing | Bearish Engulfing |
| Morning Star | Evening Star |
| Dragonfly Doji | Gravestone Doji |
Step 4: Wait for Confirmation
The pattern alone isn't enough. Wait for the next candle to close in your direction. This single rule will save you from countless false signals.
Step 5: Execute with Proper Risk Management
- Entry: Above/below the confirmation candle
- Stop loss: Beyond the S&R zone (on the other side of the pattern)
- Take profit: The next key level, with a minimum 1:2 R:R
The Confluence Checklist
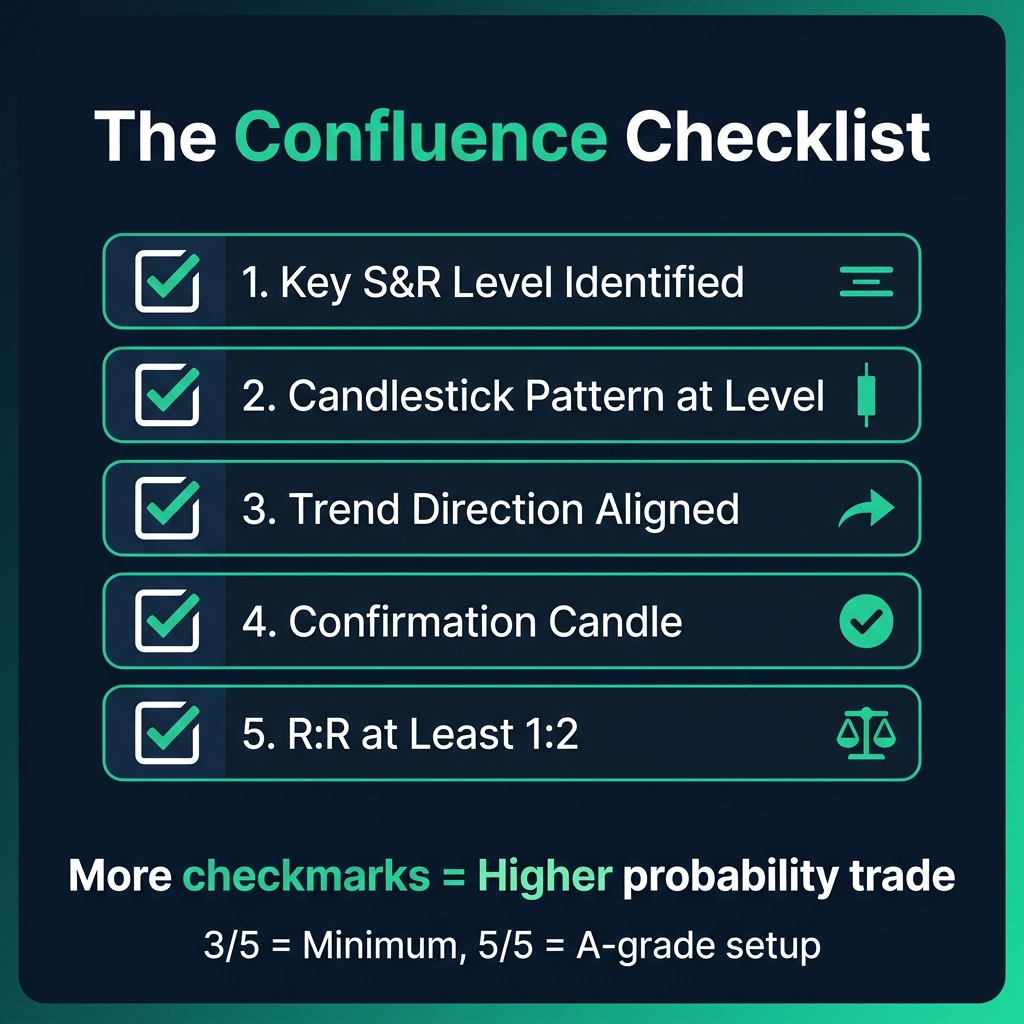
Confluence means multiple factors aligning at the same point. The more factors that agree, the higher the probability of your trade succeeding.
| # | Factor | Example |
|---|---|---|
| 1 | Key S&R Level | Horizontal support with 3+ touches |
| 2 | Candlestick Pattern | Hammer forming at the level |
| 3 | Trend Alignment | We're buying in an uptrend (with the trend) |
| 4 | Psychological Level | The level aligns with 1.1000 (round number) |
| 5 | Polarity | Previous resistance → now acting as support |
🎯 Grading your trades:
⭐ 2 factors = Weak setup (skip it)
⭐⭐ 3 factors = Decent setup (consider it)
⭐⭐⭐ 4 factors = Strong setup (take it)
⭐⭐⭐⭐ 5 factors = A-grade setup (trade with confidence)
Real-World Application: The Decision Tree
Here's a mental framework to use for every potential trade:
- Is price at a key level? → No → Do nothing. Wait.
- Is there a candlestick signal? → No → Do nothing. Wait.
- Does the next candle confirm? → No → Do nothing. Wait.
- Is R:R at least 1:2? → No → Skip this trade.
- All yes? → Execute the trade.
Notice the pattern? You're saying "do nothing" most of the time. That's professional trading. You wait, wait, wait — and then strike when everything aligns.
Common Mistakes When Combining S&R + Candles
- "I see a hammer, I buy!" — Without checking if it's at a key level, you're gambling.
- "Price is at support so I'll buy immediately" — Without a candlestick signal, you don't know if support will hold.
- "I'll trade every signal I see" — Quality over quantity. Wait for A-grade setups only.
- "I don't need confirmation" — Skipping confirmation is the #1 reason for false entries.
Quick Recap
- ✅ S&R = WHERE to trade, Candlesticks = WHEN to trade
- ✅ The 5-step process: Identify level → Wait → Spot pattern → Confirm → Execute
- ✅ More confluence factors = higher probability trades
- ✅ Professional traders say "do nothing" 80% of the time — patience is your edge
- ✅ Never trade a pattern without a level. Never trade a level without a pattern.
🎯 Your Action Step
Go back through your EUR/USD or GBP/USD Daily chart. Find one perfect A-grade setup — a trade where a key S&R level, a candlestick pattern, trend alignment, and confirmation all came together. Note the entry, stop loss, and take profit. That's the standard you should hold every future trade to.
Level 4 complete! → Take the Module 2 quiz to test your candlestick pattern knowledge and earn your Price Action certificate.